Showing posts with label kitchen adventures. Show all posts

Tuesday, February 16, 2021

Sous Vide Cooking

 Have you ever heard of Sous Vide Cooking?  I have heard of it but never had tasted it. 

According to Wikipedia, Sous Vide is the French for under vacuum.   Sous Vide Cooking is known as low temperature long time cooking which is a method of cooking in which the food is place in a plastic pour and cooked in a water bath for longer than usual cooking times at a precisely regulated temperature.

Recently, I have had the opportunity to review a Sous Vide device and over the past week-end, we have cooked not once but twice with it.

The pictures included in this post show you the second meal we have made which was a roast.

We have put the roast in a plastic bag and remove the air in the bag using a vacuum sealer machine.  You can also use a Ziploc bag and press carefully to remove all the air.


Afterward, we set up the Sous Vide cooking device on either a pot that can contain a large quantity of water or a Sous Vide container like this one below.


Our Sous Vide device is KitchenBoss G320 model.  This one is somewhat different than other models on the market as it allows the water to circulate in the container allowing the meat to be cook equally.  This model possess a color LCD allowing you to pick an already set mode or set your own mode like we did below.   We have set the temperature to 140F and the cooking time to 2 hours.


Once the water has reached the desired temperature, you simply have to put your bag in the water to cook it.


Once cooked, we can cook the meat to grill it - this usually take less time that you would do usually since you already cooked it sous vide style.  For the roast, we cooked it approximately for 15 minutes in the air fryer.  Look at this beautiful piece of meat!  


We really enjoyed both the meals we have done with the sous vide kitchen tool.   This has become my husband favorite item in the kitchen apart from the air fryer.

The meat was so tender it was almost unbelievable.  Everyone enjoyed their meal when we used it.  

Below are the items we use for sous vide cooking:

KitchenBoss Sous Vide G320

Automatic Vacuum to remove the air 

Rubbermaid 12 Quart Container

Philips Air Fryer XXL 

Two items that we would like to add eventually would be:

Cover for the Rubbermaid 12 Quart Container
 

The rack to hold items in the Rubbermaid Container

Have you ever eaten something cooked Sous Vide?   I would strongly recommend that you try it out.  It is definitively an item that will be part of our lives for years to come.   We look forward in discovering other type of meat to cook with this technique. 

Bon Appétit!

Friday, May 26, 2017

Philips Avance Pasta Maker with Integrated Scale

I’ve always wanted to make my own pasta but the process seemed a bit too much for me – lots of time and patience was needed.   Even when my husband got me a KitchenAid mixer which also has attchments to make pasta I decided against it.image

So imagine my delight when I saw the Philips Avance Pasta Maker available for review on Amazon Vine Voices. I did not hesitate one second and decided to take the opportunity to review this kitchen appliance.

While waiting for the delivery, I proceeded to look at some videos on how to use it.  The more I watched, the more I was getting excited.  I mean this machine was looking absolutely perfect in many ways.  Not only could you decide the type of flour you will use but you could also be original in the liquid to incorporate as well.   Want orange pasta?  Use carrot juice.  Want green pasta?  Use spinach juice. Want pink pasta?  Use bee t juice.   You could even obtain black pasta with squid ink.  You can incorporate spices to make your pasta more interesting.    And in 15 minutes you will get a plate full of delicious pasta for your family.

The HR2358/05 model possess an auto-weighting which weighs the flour and indicates the correct amount of liquid for the perfect texture.   The model also comes with eight shaping discs to make spaghetti, fettucini, penne, lasagna, angel hair, thick spaghetti, tagliatelly and pappardelle.   You will also found in the box a flat scrapping and cleaning tool, a flour cup and water cup as well as a free recipe book with over twenty different recipes to make.

The process is quite easy to follow.  Plug your machine and decide the type of pasta you want to make (basically you choose between regular pasta or egg pasta).  We decided to make egg pasta.  Pour the flour in the machine, close the lid and the machine will indicate how much liquid you need to incorporate.  Note that the liquid cup already contains two eggs because we were doing a double recipe for our family of six.   The book indicates that a double recipe would be enough pasta for 3-4 main meal or 8-10 side dish.  Seeing we are a family of six, I was wondering if I needed to make a double recipe followed by a single recipe.  We decided to stick with only a double recipe.

IMG_2784

Once the machine starts, you will have to pour the liquid slowly in order for the pasta to mix equally.

IMG_2785

Then for about 2-3 minutes the machine will mix the flour with the liquid. 

IMG_2786

Once that time has passed, the pasta already comes out.  We have selected the spaghetti disc for our lunch.
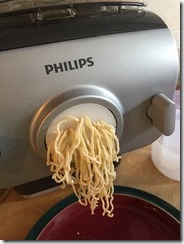
IMG_2787

Every once in a while you take the pasta in your hand and proceeded to cut it using the scraping/cleaning tool.  It is so easy to do that my nine years old daughter could do it.

IMG_2790 IMG_2791

Once the bulk of the dough has gone through the disc, the pasta maker will reverse in order to collect the leftover dough and then proceed to push the dough back in to make more pasta.  This happened twice in the 15 minutes it took to make the pasta.

And seriously, we had enough pasta for the whole family.   All we needed to do now was to boil the pasta in hot water.   It took about 4-5 minutes to boil it.

IMG_2793

Lunch was super delicious too!   We knew exactly what was in the pasta we made and it was quick to do.

IMG_2794

The fact that we can choose the type of flour, the ingredients as well as the liquid makes the Philips Pasta Maker a versatile kitchen appliance. Here’s another advantage to own the Philips Avance Pasta Maker – you can make cookies too!   You can purchase two extra discs which will allow you to make low fat healthy cookies for your family.

image

This machine is definitively a keeper in our family.   Everyone really like the texture and the taste of the pasta it made and the process was very easy to do.  To top it off, the pasta made with this machine can be store in ziploc bags and put in the freezer for future use.   This is definitively an huge bonus for our family.   We plan to make pasta in advance and freeze it.   My oldest kids also plan to make pasta for a challenge at youth called Master Chef.   Having fresh pasta for a meal they cook during a youth night that will be judge by the leaders would definitively give them an advantage.   

The Philips Pasta Maker is a great gift for a wedding, a birthday, or Christmas. 

The Philips Avance Pasta Maker with Integrated Scale is available for purchase at amazon.ca.


You can also get a model without the scale too!


And do not forget the extra discs for the cookies.

Disclaimer: This product has been provided courtesy of Amazon.ca Vine Voices for review purpose. I was not monetarily compensated for this review. Please note that the review was not influenced by Amazon.ca or the Sponsor in any way. All opinions expressed here are only my own.

Saturday, January 2, 2016

Oven Baked Falafels

This past two weeks, my husband was off work and it was very nice to have him home.   My husband loves to cook and this time he decided we will try making falafels.   We made a first batch following a recipe he had found on the internet but we needed to cook them in oil.   Last week, we decided to make meatballs and used mini muffin pans I had (2 twenty-fours and 2 twelves).   Hubby really liked using the mini muffin pans for the meatballs and already we had a ton of ieas on how to use them.   To be honest, these pans were barely used anymore.   But with a family of six and our big batch of cooking we make, these pans were not enough.

So one day, hubby thought it would be nice  to make more falafels but this time we would try to do it in the oven instead.  But to make more falafels and using the mini muffin pans, we didn’t want to stay inthe kitchen for too long.  So we decided that it would be a good idea to purchase more mini muffin pans.   I checked on Bed Bath and Beyond to see what was available and we discovered that a pan making 48 mini muffins existed.   We had a few of 20% off coupons so we decided to check to Wal-Mart before going to Bed Bath and Beyond.  Wal-Mart did have the 48 mini muffins pan but the price was higher than the one at Bed Bath and Beyond with the 20% off coupon.  So off we went to Bed Bath and Beyond in order to purchase a couple of 48 mini muffins pans.

Back home, we proceeded to prepare our mixture.  We had also purchased fresh parsley and coriander for the recipe. We had a bag of chickpeas that had been in the water since the previous day.  You will need a food processor to make this recipe.

Oven Baked Falafels

2 cups of soaked chickpeas
4 cloves of garlic
1 small onion, finely chopped (or half of a big one)
1/4 cup of fresh parsley, finely chopped
1/8 to 1/4 cup of fresh coriander, finely chopped
1 1/4 tbsp of flour
1 1/2 tsp salt
2 tsp cumin
1/2 tsp pepper
1/2 tsp cayenne pepper
1/2 tsp chili powder
1 pinch of ginger

Before anything else don’t forget to do the following:

1) Chop garlic

IMG_5651

2) Chop the parsley

IMG_5652

3) Chop the coriander

IMG_5653

4) Chop the onions.

IMG_5654


Once all your ingredients are prepared, incorporate all the ingredients in a bowl and mix with a fork to blend the flavors.  For the dry chickpeas that had soaked all night, we decided to add 1/4 cup of lemon juice and mix some more.   

Take your food processor out and put the ingredients in it.  On pulse settings, slowly bring the mixture to a mush (Do not bring to humus consistence!).   Once this is done, transfer the mixture in another bowl and continue with the rest of the ingredients until you have gone through all the soaked chickpeas.

IMG_5656

It is now time to make the falafels.   Our first time, we asked the younger three kids to make the balls which my husband cooked in the oil.  But we prefer not to have too much oil cooked food so the mini muffins pans are handy for this.   We filled each of the mini muffin holes with the mictures until the two pans we had purchased were full.

IMG_5657

Bake at 400 degress for 30 minutes.

IMG_5658


To make you sandwiches, use half a pita bread, spread tahini and a bit of ranch salad dressing, place cucumbers and tomatoes in it.  Use two falafels cut in two and roll it to eat.   Delicious!

IMG_5659

BON APPETIT!

IMG_5660


Note:  Once we went through the soaked chickpeas we had, we decided to use the cans of chickpeas that were in our cupboards.   Make sure you rinse these thoroughly before using them in the recipe.   We also skipped the lemon juice step.   And it will take 35 minutes to cook the falafels if you use the canned chickpeas.

In case you are wondering which mini muffin pans we have purchased, we used the Wilton Mini Muffin Pan – available on amazon.ca and amazon.com as well as Bed Bath and Beyond and Wal-Mart.  We have since purchased another one for our bulk cooking and plan to purchase a few more eventually.